Basler Camara
Description
Basler cameras are a range of high-performance imaging devices designed for various industrial, medical, and scientific applications.
The images captured by the camera can be used as input in the flow. The camera can be connected to the machine via Ethernet or USB.
Real-time Camera Temperature Monitoring

Zene can monitor the camera's core temperature in real-time. The camera's temperature is displayed in the Server Status Information area, see Server Status Information for more information.
In this example, the camera's core temperature is 59 degrees Celsius.
The colour of the temperature indicates the core temperature of the camera.
- Green: Below
55degrees Celsius. - Yellow/ Orange: Between
55and66degrees Celsius. - Red: Above
66degrees Celsius.
The 66 degrees Celsius temperature should be below most of the Basler cameras' Critical Temperature Threshold. We have chosen this temperature as the threshold because the camera's temperature can increase rapidly when the camera is in use, and it is better to be safe than sorry.
Over Temperature can Damage the Camera
When a camera enters the over temperature mode, the camera must be cooled immediately.
Otherwise, irreversible damage may occur to the camera
Please double check the camera's Critical Temperature Threshold before using the camera. See Basler - Temperature State for more information.
Settings
Each camera model has its own settings/ parameters, if they are unavailable the settings will be disabled.
Select Camera
Select a camera from a list of connected Basler cameras.
Zene UI
Select Camera

When using Zene UI, the user can select the camera from the list of connected cameras. The list is updated automatically when a new camera is connected or an existing camera is disconnected.
In the image above, the list contains the camera's name, and serial number. In this case, the camera's name is Nabrio_test1 and the serial number is covered by the red box.
Camera Model

After the camera have been selected, the camera's model is shown below the selector. In this example, the camera's model is acA2440-20gc.
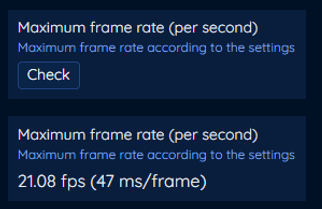
The user can check the maximum frame rate of the camera by clicking the Check button. The maximum frame rate is displayed in the Maximum Frame Rate field. In this example, the maximum frame rate is 21.08 fps or 47 ms / frame.
The maximum frame rate will change based on the camera's settings, such as resolution, exposure time, and gain. If the user would like to know the maximum frame rate after changing the camera's settings, click the Check button again.
Region Of Interest (ROI) controls
See Basler - Image ROI for more information.
Pixel size
Set the camera pixel frame size.
Offset centre X
Sets ROI in the x-axis to the centre (if set this will disable the offset X value).
Offset X
The offset position of the first pixel of ROI in the x-axis.
Offset centre Y
Sets ROI in the y-axis to the centre (if set this will disable the offset Y value).
Offset Y
The offset position of the first pixel of ROI in the y-axis.
Analog controls
Gain Auto
Automatically corrects color shifts in images acquired. See Basler - Gain Auto.
- Off - Disables Gain auto
- Once - Automatically adjusts the gain (raw brightness) value until the auto-target value is reached or after a maximum of 30 calculation cycles. Then the auto function will be set to Off
- Continuous - Automatically adjusts the gain (raw brightness) value throughout the running period.
Gain raw percentage
The raw gain (raw brightness) percentage. See Basler - Gain.
Black level percent
The black level (overall brightness) percent. See Basler - Black Level.
Gamma correction
Optimise the brightness of acquired images for display on a monitor. See Basler - Gamma Correction.
Image Format Controls
Pixel format
An image pixel format from the camera. The available image format depends on the camera model. See Basler - Pixel Format.
Please note that the input image from the camera will be converted to 8bit format for use within Zene.
Image quality controls
Basler PGI mode
A Basler image optimisation feature set including noise reduction, improved sharpness, 5x5 demosaicing and colour anti-aliasing. This mode is only available for a non-Bayer pixel format and some mono pixel formats. See Basler - PGI Feature Set.
Light source temperature
Source colour temperature between 2200k, 5500k and 6500k. See Basler - Light Source Preset.
White balance auto
Automatically corrects color shifts in images acquired. See Basler - Balance White Auto.
- Off – Disables White balance auto.
- Once – Automatically adjusts the white balance until the white balance is reached or after a maximum of 30 calculation cycles. Then the White balance auto sets to Off.
- Continuous – Automatically adjusts the white balance throughout the running period.
Acquisition controls
Exposure Auto
Automatically adjusts the exposure time within specified limits until a target brightness has been reached. See Basler - Exposure Auto.
- Off – Disables Exposure auto.
- Once – Automatically adjusts the exposure until the auto-target value is reached or after a maximum of 30 calculation cycles. Then the Exposure auto sets to Off.
- Continuous – Automatically adjusts the exposure time throughout the running period.
Exposure time absolute
The absolute exposure time in microseconds. This is only available if Exposure auto is set to Off. See Basler - Exposure Time.
Network (GigE camera)
See Basler - Network Related Parameters for more information.
GigE packet size
The data stream packet maximum size in byte. This should always be set to the maximum size that your network hardware can handle (only available for Basler ace GigE).
GigE inter-packet delay
The delay between the transmission of each packet (only available for Basler ace GigE).
Grab strategy
Please note that the settings in this section will impact the time it takes to grab an image from the camera. Make sure then the settings does not impact your application.
Timeout
The timeout in milliseconds for the camera to respond. If the timeout is reached, the tool will retry to connect to the camera. Default is 3000 milliseconds.
Retry amount
The amount of times to retry to grab an image from the camera. This includes reopening the camera connection if the option is enabled.
Allow to reopen
Whether to allow the camera to reopen the connection if the camera connection is lost.
Please be aware that reopening the camera will take a few seconds.
Grab strategy
The strategy to grab an image from the camera.
The available strategies are:
One-by-one: The images are processed in the order of their arrival.Latest image only: Only the latest image is processed. The previous images are discarded.Latest images: This strategy can be used to grab images while keeping only the latest images. If the flow does not retrieve all images in time, all other grabbed images are skipped. The number of images to keep can be set in theMaximum grab bufferfield.Upcoming images: The tool waits for the next image to arrive.
Maximum grab buffer
The maximum amount frames in the buffer. This is only used when the grab strategy is set to Latest images.